Monday, April 22, 2013

for my mummy


This is my second mobile pouch.
I specially made this for my mummy………
She is a retired teacher of 60. She is always busy with her vegetable garden and other things. So I can’t get her in the phone.
After making the first pouch I decided to make a second one for her with a long chain, which helps her to carry easily. By wearing this in her neck she can do the works and also attend calls at any time. I also make a flap for the pouch and stitch a button over it.  
I think this will be useful for her…..

My next attempt will be one for my sister…………..

Saturday, April 13, 2013

RECYLED CRAFT- DOOR MAT

Door mats are very useful and necessary thing in our day to day life. There are different types of door mats available in the market, made of coir, nylon, rubber, cloths, etc. The cost also will be high. 

There are a lot of materials that you can recycle into handmade mats for your house. For that just clean your wardrobes…… You will find your old cloths such as torn salwars, sarees, unused dupattas etc. By make use of these things you can make a unique doormat. It also looks better than the other one which we were buying from outside.
When I was doing my post graduation we were in hostel. At that time we had a lot of time after the class, so we learned some crafts from our room-mates. One of my friends told me she will teach how to make mat using old cloths. After finishing the course I tried it in my house. It was very easy to make and also looks good. Then I taught this to my mother and she also like this very much. Now she is very busy with this mat making and also shares some of her creativity with our relatives.

This is a very easy craft and I will share how to make a stylish mat for your house. For that first you have to cut the cloth into long strips with one or two inch width. Next you have to sew strips together end to end that will make the strip lengthy. You need 3 such long strips for the braiding (like our hair braiding) process.  Start braiding tightly and if your desired length is not reached attach new strips using needle and thread. As your work finish, shape the mat into round, oval, rectangular or square according to your preference. Then sew it together with strong thread and tight stitches. The stitches should be very strong, otherwise it will begin to unravel. You can also put a thick cloth as a base for the mat and sew over it. This will give more strength for the mat.
I prefer my mother’s old sarees for this because it is very long and enough for one perfect mat. The pallu side can use for the centre part or the outer border of the mat. Different colored duppattas also look good, for that you have to select the combination colors.


Please try this and make your house clean……….


Sunday, April 7, 2013

SMOCKED PILLOW

One day I was watching the television, because of the boring programs in the channels I search some interesting one. Then I stuck on one which was showing some craft.
 It was making of some smocked round pillow…….
I tried but am not satisfied with that ….. Then I thought to make a rectangular one ….
I didn’t have any materials to stitch the pillow. Then I thought it is a trial, why should I try it with one of my unused duppatta?……
I stitch the pillow using the duppatta and successfully finished it.
Actually it looks good in satin cloth…….

Thursday, April 4, 2013

MY CUTEY POUCH

Yesterday I was thinking to do something different using crochet. Then I got an idea to make a mobile pouch.  I made a trial and it came out good.
It looks very beautiful and it makes me so happy…………..
I make it cuter by fixing a bow on it using glue.
You can attach a long thread on either of its side.


According to your imaginations you can also add more attachments on it.
Fresh up your creativity…………..


Wednesday, April 3, 2013

CROCHET FLOWER

When I was searching the crochet patterns I saw some beautiful crochet flowers. Then I decided to make this flower. For that I tried some videos. Finally I realize that the crochet lower making is a very simple craft. I made some flowers, it looks very nice.
This flower contains 3 layers. You can also add more layers according to your imagination and multicolor for the layers. By fixing any show buttons or glitters at the centre it become more beautiful.


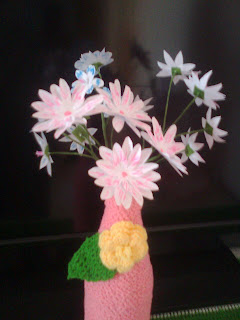
After making these flowers I got an idea that why should I fix this on my newly made flower vase….? This makes the vase more beautiful.  You can try this with hair bow also. Attach this over your bow and make it unique............

RECYCLED CRAFT- BUTTERFLY


This is a very easy craft. I have learned this from one of my
cousine sister when I was a kid. Materials used for this are very
 common and inexpensive.

Materials required:
            Soap cover, glue, scissor, stapler, color pen.
   
How to make:

Take the soap cover and separate the inner and outer covers.
Then cut the outer covering and make two squares, one is     bigger and other smaller.
Fold the squares zigzag from one corner to the opposite corner.
Now you will get the wings of butterfly. With the help of  the stapler attach the two wings.
Now we will make the body of the butterfly by cutting the inner covering.
You can draw the face and body of the fly and fix 2 antennae on its head by cutting the paper.  
Now your butterfly’s wings and body is ready. Fix the body on the centre of the wings using glue and allow it to dry.
Look, your beautiful Butterfly is ready……

    
Take

MY CROCHET WORK


Hi friends today am going to share some of my Crochet work in front of you. Last few years was looking for some interesting crochet patterns. I have searched in the Google for such good patterns. Finally I got something that I can make.
I have learned this craft from my aunt. She is a home maker and a mother of 3 children. She has a neighbor who knew crochet. She has some crochet books and diagrams of crochet stitches. She taught me the basic stitch like How to start crochet…..? How to do the chain stitches….? Then my interest on that increase.  I asked her to give some of the pattern diagrams and start work on it. Firstly I made a Granny’s square with different colors of wool. Then using the same method I tried one mat with 3 sides. It came out very good and we used it as telephone base. After that I tried so many different types of patterns and successfully finished.

Crochet is a process of creating fabric from yarn or woolen thread using the crochet hook. There are only a few basic crochet stitches to learn. Once you have the knowledge and skills you can become really creative. There are masses of crochet patterns, but they are all worked with combinations of relatively few basic stitches. Some o the basic stitches are chain stitch, slip stitch, single crochet, double crochet, double-half crochet, puff stitch, shell stitch etc. You can make any combination of stitches according to your imagination.
Some of my crochet works are:


I think you people will like my works...............


Monday, April 1, 2013

RECYCLED CRAFT- FLOWER VASE

You have lots of waste materials inside your home and don’t know what to do with it, except for throwing it off. Hold on guys, I have some creative ideas! Now you can recycle the waste materials to get the best out of it. Hope you like it.
FLOWER VASE  

Flower vase 1:

Materials required:
            One empty sauce bottle, woolen thread (white & pink), gum.
Procedure:
Ø  Clean and dry the bottle.
Ø  Wrap the woolen thread (any color) around the bottle from the top with the help of gum. ( Please apply gum in small intervals )
Ø  While reaching at the middle of the bottle change the thread color. (Or you can use single color )
Ø  Your beautiful flower vase is ready to arrange the flowers.
Ø  You can also attach flowers, glitters, shells etc on the vase. (Crochet flower is used here)


Flower vase 2:


Materials required:
            One empty sauce bottle, woolen thread pink (any color),

crochet needle, gum.
 Procedure:
Ø  Clean and dry the bottle.
Ø  Take the woolen thread and make chain stitches using the crochet needle. The length should be according to the size of the bottle. 
Ø  Wrap the woolen thread around the bottle from the top with the help of gum. ( Please apply gum in small intervals )
Ø  Your beautiful flower vase is ready to arrange the flowers.
Ø  You can also attach flowers, glitters, shells etc on the vase. (Crochet flower is used here)


Is it a good idea